Install and set up DualGridBot on your computer
Everything you'll see the first time you launch the bot, step by step: creating your Binance Futures API key, activating your subscription, and finding your way around the main panel. This guide is open to everyone — no login needed.
Before you begin
DualGridBot is a desktop app that runs on your own computer. To set it up you need:
- An active subscription. Subscribe with USDT from the Pricing section — activation is instant. Your Subscriber ID and Activation Key are emailed to you, and are always shown on your Overview page.
- A Binance Futures account. You'll create an API key there in step 2 below.
- On the warning screen, click "More info".
- A "Run anyway" button appears — click it, and the installer proceeds normally.
(The button text matches your Windows language — for example "More info" / "Run anyway" in English.) You only do this once, when you first run the installer.
What You'll See
This is the exact window that opens the first time you launch the bot on a computer. Each numbered arrow in the picture matches the same number in the list — everything you need to fill in and where it comes from.
- 1 Key method — leave it on "Let the bot create the key (recommended)." The bot makes a secure Ed25519 key pair; the private half never leaves your computer.
- 2 Public key + Copy — the bot shows a public key. Copy it with the Copy button and paste it into Binance (step 2).
- 3 API Key from Binance — after Binance creates the key, it gives you an API Key. Paste it here.
- 4 Test Connection — click to confirm Binance accepts the key before continuing.
- 5 Subscriber ID / Activation Key — paste the two values shown on your Overview page once you're subscribed.
- 6 Verify — confirms the Subscriber ID and Activation Key you entered are correct.
- 7 Save and Continue — saves everything on this computer and opens the bot's main panel.
1. Create Your API Key (in the bot)
The first time the bot runs on a computer (or after its local key file has been removed), it opens a "First-Time Setup" window and asks for a Binance Futures API key before it can do anything else.
- Keep the top option on "Let the bot create the key (recommended)." The bot generates a modern Ed25519 key pair right on your computer. The secret (private) half is encrypted to your Windows account and never leaves the machine — you only ever hand Binance the public half.
- Press Copy to copy the public key. You'll paste this into Binance in the next step.
- Leave this window open and go to Binance (step 2). When Binance gives you an API Key, come back, paste it into the API Key from Binance field, and press Test Connection.
Your keys are stored only on that computer — never sent to our servers or anywhere else. Treat them like a password, and never share them.
2. Create the Key on Binance
With the public key copied, open Binance and create the matching API key there. In your Binance account, go to Account > API Management and click Create API.
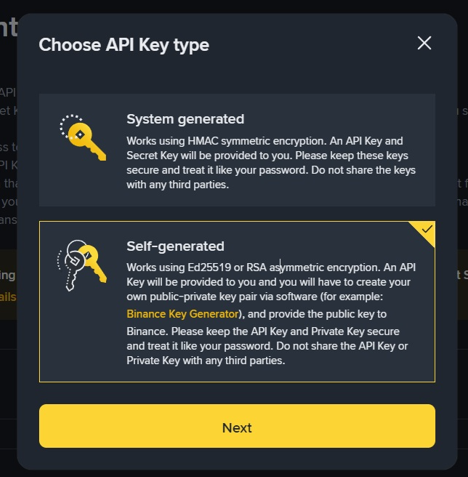
2a. Choose the key type
Binance asks what kind of key to create. Pick Self-generated:
2b. Paste the public key
Binance opens an Upload public key box.
-
Paste the public key you copied from the bot — the whole thing, including the
-----BEGIN PUBLIC KEY-----and-----END PUBLIC KEY-----lines — then press Next. - Give the key any name you like and complete Binance's security verification. Binance will then show you an API Key.
2c. Set the key's permissions
After the key is created, open Edit restrictions on it:
- Turn Enable Futures ON — the bot can't place or manage orders without it.
- Leave Enable Withdrawals OFF, always. The bot never needs it, so even in the worst case (someone getting hold of the key) your funds can't be moved out.
- Set IP access to Unrestricted (your computer's IP usually changes), unless you know your IP is fixed.
Then copy the API Key Binance gives you, return to the bot, paste it into API Key from Binance, and press Test Connection.
3. Subscription Activation
Below the API key section, the same window asks you to activate your subscription on that computer.
- Enter the Subscriber ID and Activation Key you received when you subscribed — once a subscription is active, both are shown on your Overview page.
- Use Verify to confirm the Subscriber ID and Activation Key are correct before finishing setup.
4. Save and Continue
Once both sections are filled in, click Save and Continue. The bot saves your key locally, activates your subscription on this computer, and opens the main panel. You won't see this setup window again on this computer unless its local key file is removed.
5. Understanding the Main Panel
This is the main panel — one box per bot (Symbol 1 on the left, Symbol 2 on the right, if you're running two). The picture below zooms in on the left panel; the right one is laid out exactly the same way. Here's what each part shows and does.
- 1 Symbol & price — the symbol/side this panel is trading, and the live price. Click the price to open it in its own larger window.
- 2 Risk badge (e.g. High Risk, Liquidation Risk) — click it any time for a full risk breakdown, including your estimated liquidation price.
- 3 RUNNING / STOPPED badge — shows whether this panel is currently active. This is a status indicator, not a button — see "Starting and Stopping Your Bot" below for where to actually start or stop it. Clicking it opens a larger, streaming-friendly view of this panel.
- 4 Change Symbol Settings — opens the page where you set this panel's symbol, side, quantity, grid size, leverage, and similar trading settings. See "Changing Your Bot's Settings" below.
- 5 Show Current Settings — fetches and displays exactly what settings this panel is running with right now.
- 6 ⚙ Advanced — manual position tools and price-triggered automation. See "Advanced Options" below.
- 7 Margin balance / Liquidation / Entry price / Unrealized P&L / Open entries / Next entry target / Next close target — this panel's live account and position figures, updated automatically.
- 8 Today's trades — how many trades closed today and today's running profit/loss; click for a fuller breakdown (today, yesterday, this week, this month).
- 9 Mini price chart — a quick, at-a-glance view of recent price movement for this symbol.
- 10 Save / Reset / Close Oldest Entry — Save stores the local options set in ⚙ Advanced (auto-close, stop-when-flat, etc.); Reset clears this panel's local position tracking without touching anything on Binance; Close Oldest Entry closes just the single oldest open entry.
- 11 Live Trade Feed — a running log of every order this bot places, across both panels, as it happens.
6. Changing Your Bot's Settings
Click Change Symbol Settings on either panel to open that panel's settings — symbol, side, quantity, grid size, max entries, leverage, and margin type. This opens in your browser, already signed in, so you don't need to log in separately.
Once you save a change there, the bot picks it up on its own within a few seconds — you don't need to restart it, and you don't need to press Show Current Settings afterward either (that button is there mainly so you can double-check what's active right now, any time).
7. Advanced Options
The ⚙ Advanced button on each panel opens a few tools for less everyday situations:
- Manual Add / Manual Close / Manual Adopt — for a position you opened or changed directly on Binance, outside the bot.
- Pending price triggers — set a price that will automatically start this panel once reached, or automatically close everything and stop it once reached.
- Disable auto-close / Stop when flat — two checkboxes that change how the bot behaves around closing positions.
- News pause — pause this panel for a set number of minutes (manually, or automatically around major news events).
If any of these aren't self-explanatory once you're looking at them, open a support ticket and we'll walk you through it.
8. Starting and Stopping Your Bot
The main panel's RUNNING/STOPPED badge is a status indicator, not a button — starting and stopping happens from your Bot Controls page on this site (Start, Stop, Reset, Close Position, and Close Oldest Entry, for each panel). Like settings changes, this applies to the running bot within a few seconds.
Ready to get started?
Subscribe and follow the steps above. If anything on your screen doesn't match this guide, we're happy to help.